Monday, April 25, 2016

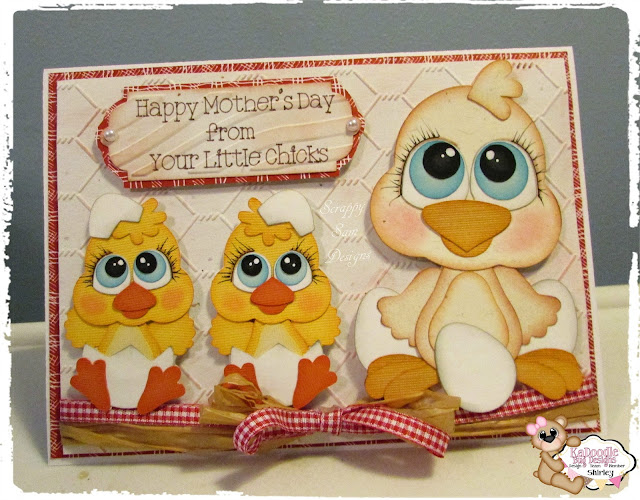
Hen and Chicks Mother's Day Card


It will be Mother's Day before we know it, so I made a cute little card for my two granddaughters to give their mother. I used the KaDoodlebug Designs Patterns, CK Hen and CK Chick. They can both be found here:
http://kadoodlebugdesigns.com/shop/index.php?main_page=index&cPath=55&sort=20a&page=10

My card started with a 5 by 7 inch card base. I added a 4 3/4 by 6 3/4 inch red plaid mat, then a 4 5/8 by 6 5/8 inch light tan mat that was run through my Cuttlebug with the Chicken Wire embossing folder. I lightly inked this mat with brown ink. I wrapped this mat with 1/4 inch wide gingham ribbon and raffia tied in the middle and taped to the back.This was attached to the card base with foam tape. 


I made the hen about 4 1/4 inches tall. She was attached to the right side with foam tape.


The chicks were made 2 3/4 inches tall. One was reversed so they would be slightly different. These were attached to the left side with foam tape.


Finally I made a 3 1/4 by 1 1/8 inch label and sentiment using my Explore. I ran it through the Cuttlebug using the Woodgrain border embossing folder. I added a red plaid mat behind it and pearl accents. This was added above the chicks with foam tape.

I love how this card turned out! Thanks for stopping by and I'd love to hear what you think.


Wednesday, April 20, 2016

Under the Weather Tissue Holder


Today I am sharing a cute little tissue holder I made using the following files from Digital Delights by Louby Loo:

1. "Splish Splash Susie"
     http://digitaldelightsbyloubyloo.com/index.php?         main_page=product_info&cPath=7_81&products_id=1526

2. "Feel Better Sentiment Set"
     http://digitaldelightsbyloubyloo.com/index.php?main_page=product_info&cPath=59_34&products_id=1510
      
3.  "Rainbow Digital Paper Pack"
     http://digitaldelightsbyloubyloo.com/index.php?main_page=product_info&cPath=103_110&products_id=1022
     
CARD RECIPE

DD Digi Stamps used: Splish Splash Susie, Feel Better Sentiment Set

Cardstock and papers: Rainbow Digital Paper Pack by Digital Delights by Louby Loo, image printed on Spectrum Noir Cardstock by Crafter's Companion, sturdy cardstock in light and dark blue and red.

Markers: Spectrum Noir Alcohol Markers

Acc./ Embellishments: Red paper butterfly, small blue pearls

Special Techniques: The file for the tissue holder can be found in different forms here:    http://jamiek711designs.blogspot.co.uk/2012/11/jaded-blossom-early-sneak.html
I attached the image and sentiment to the decorative mat in Design Space before the mat was printed and cut out.

COLOR PALETTE 


Skin: FS2, TN2, PP1
Hair: TN2, TN4, TN6, TN9
Umbrella: CR10, CR11, GB3, OR1, CT2, CT4, LG3, CG4, TB4,     TB5
Jacket & Boots: CT2, Ct4, GB3
Skirt & Boot Trim: PL1, PL4

I hope you enjoyed my little project. I'd love to hear from you. Thanks for stopping by! ~ Shirley

Thursday, April 14, 2016

You're My Cup of Tea Easel Card


Today I'd like to share an easel card I made for the current KBD Challenge, "Black and White Tea Party." I combined two KaDoodleBug files for my card. The Panda and teacup are, "CK Teacup Panda" found here: http://kadoodlebugdesigns.com/shop/index.php?main_page=product_info&cPath=55&products_id=756
The teapot is a revised version of the teapot from Pumpkin Tea Mouse," found here:    http://kadoodlebugdesigns.com/shop/index.php?main_page=product_info&cPath=15&products_id=556
The sentiment is from Cricut.


MATERIALS

Cardstock: White, black and blue
Black print cardstock: COLORBOK
Butterfly: Micheal's
Flowers: Recollections

Using the slice feature on my Cricut Explore, I sliced the mouse off the base layer of the teapot. I sized the teapot so it was 9 inches across the widest point.  I duplicated this base and sliced the top half of the teapot off, duplicated the bottom half. I took the duplicated piece, flipped it, lined it up slightly overlapping the other piece at the widest end and welded the two pieces together. 
I sized this piece so it was 8 inches at the widest point. I lined up a 6 1/2 inch circle to the bottom of the piece I just made so the two pieces overlap about 1/2 inch, and welded the pieces together. I added score lines at the base of the teapot piece and at the mid point of the teapot piece. When folded on the score lines this is the card base.

I glued the in tact teapot so the bottom half is lined up with the top portion of the base which has been folded forward. I completed the teapot and assembled the panda in the teacup. I used foam tape on some pieces to add dimension. I added a butterfly to the top of the teapot and a flower to the bottom right side. Another flower was added to the bottom  left of the teacup.


I made a 1/2 inch by 3 inch four box to attach the panda to the teapot so he is slightly in front of the teapot.

A 5 1/2 inch circle was cut from the same paper as the teapot and was added to the base circle. The sentiment was made using Print Then Cut, and is about 5 1/4 inches wide. I added a black and white polka dot mat behind it. It was attached to the base with foam tape. Another flower was added near the sentiment. 

This card is over sized, measuring 9 inches across at the widest point of the teapot. Here is a side view showing how the card was put together.


I hope you liked my card and I'd love to hear what you think. Thanks for stopping by!


Tuesday, April 12, 2016

Cinderella Stand Up Card


Hi! When I saw this My Besties image I immediately thought of Cinderella, so I gave her some mice helpers from the "Sew Adorable" file from Little Scraps of Heaven Designs.

To make the card base I used a 6 1/2 inch by 12 inch piece of green textured heavy cardstock. I scored the piece at 2, 4, 8 and 10 inches. I then marked a point 2 1/2 inches up from the bottom on both ends. I then made a line from this point to the top of the 4 inch score line and from the 8 inch score line to the 2 1/2 inch mark at the other side. I cut the triangular piece off from the top of each side to make the final card shape.

The center mat is 3 1/3 inches by 6 1/4 inches. I made the side mats by tracing the side panels then cutting the pieces down. I attached the mats with a tape runner then added purple gems as accents. I added the word, "Dream" to the upper left of the center mat using small Making Memories stickers.


The My Bestie image was printed on Spectrum Noir Cardstock and colored with Spectrum Noir Alcohol Markers, then fussy cut out leaving a small white border. She was added to the card with foam tape.

COLOR PALETTE

Skin: FS1, FS4, TN2 ,PP1, PP3
Hair: CT1, CT2, CT3, GB5, GB7
Dress: HB1, HB2, HB3, LV3, CG1, CG3
Ribbons: PL2, PL3, PL5
Sweater/Cape: DG2, CG2, DG3
Accents were added with glitter gel pens.


These mice were cut at 2 3/4 inches. The mouse on the thread was cut at 3 3/4 inches. They were also attached with foam tape. The thread mouse was attached with a double thickness of foam tape sohe stood in front of the girl.


Finally, I added mats to the back and added an inspirational saying.


            I hope you liked my card and thanks for stopping by!


Monday, April 11, 2016

You're Sweet Easel Card


Hi! Today I am sharing a cute little easel card I made using the KBD file, "CK Lollipop Girl" which can be found here:

                            http://kadoodlebugdesigns.com/shop/index.php?                        main_page=product_info&cPath=57&products_id=860

and "You're Sweet" which is an older file.

The base of the card is "Square Frills Easel Card" from My Scrap Chick

MATERIALS

Cardstock in bright pink, white, black, flesh and brown
Glitter Cardstock in pink, bright pink, yellow and blue
Printed glittered cardstock is The Blossoms & Butterflies Stack from DCWV
Butterfly embellishment
1 1/2 inch light pink ribbon
Foam tape
Inks, chalk, white gel pen and black extra fine artist pen for highlighting


The card was sized to six inches square. The Lollipop Girl was made 3 3/4 inches tall. The title is about 3 1/8 inches wide.  The girl's clothes, the lollipop and the title were cut from glitter cardstock.


Add your finished Lollipop Girl and title to the card using foam tape. Add the butterfly near the title and a bow to the upper left corner. Thanks for stopping by and I'd love to hear from you!

Wednesday, April 6, 2016

Virgo Birthday Shaker Card


HI! Today is my day to post for the Digital Delights by Louby Loo New Release. I used the "Virgo Zodiac," "Happy Birthday Sentiment," and the "Zodiac Paper Pack" to make my shaker card. 


CARD RECIPE

DD files used:
VirgoZodiac:  http://digitaldelightsbyloubyloo.com/index.php?main_page=featured_products&disp_order=1&page=2
 Happy Birthday Sentiment:  http://digitaldelightsbyloubyloo.com/index.php?main_page=product_info&cPath=59_31&products_id=109

Cardstock / Papers:   DD Zodiac Paper Pack, Glitter cardstock in     white and fushia, yellow cardstock, image printed on Spectrum Noir cardstock by Crafter's Companion

Markers: Spectrum Noir Alcohol Markers, Spectrum Noir Clear Sparkle Pen

Accec./ Embellishments: 3 small silk flowers, 3-d butterfly by K & Co., beads &/or confetti for shaker, 5 by 7 piece of clear acetate, foam tape

Technique: I used my Cricut Explore to print out the image and sentiment. The image is about 2 1/2 inches tall and the sentiment is about 2 inches long. The finished card is 5 by 7 inches. I folded a 10 by 7 inch piece of yellow cardstock in half for the card base. I printed off a sheet of the Virgo paper from the Zodiac Paper Pack, then trimmed it to 4 3/4 by 6 3/4 inches and added it to the front of the card. I made a two color frame 4 3/4 by 6 3/4 inches using a file from design space. To make the shaker element, I put foam tape around the inside edges of the frame, added the acetate window, then attached it to the front of the card leaving a small opening to add the confetti. Add your confetti and seal the opening closed. Add your sentiment to the top left and the butterfly to the top right. Attach the silk flowers by the image.

Color Palette

Hair: CT1, CT3, CT4, GB4, GB5,GB9
Skin: FS2, TH2, PP1
Clothes: BT2, BT4, BT5 and BP2, BP6
Wings: Blend CT4, CG1, BP2, BP6, DR7 When dry, add clear sparkle.
Feet: TN2, TN3, JG6

Thanks for stopping by! I'd love to hear from you!

Tuesday, April 5, 2016

Little Gray Hare Birthday Card


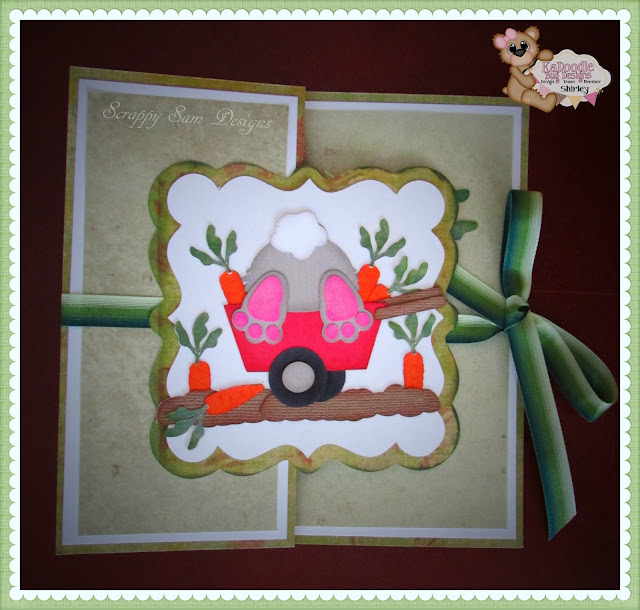
Today I am sharing a birthday card made with the KaDoodle Bug Designs file, "CK Carrot Garden" which can be found here:
http://kadoodlebugdesigns.com/shop/index.php?main_page=product_info&cPath=60&products_id=1103

                                       MATERIALS

Two sided Designer Papers from K & Co.
Plain cardstock in white, gray, red, orange, black, brown
One yard 3/8 inch green striped ribbon

Files used: CK Carrot Garden by KaDoodle Bug Designs, Mats by Cricut

The card base is 6 by 12 inches. It is scored at 3 and 6 inches. The base mats are cut at 2 1/2 by 5 1/2 inches and 2 3/4 by 5 3/4 inches for the small areas. The large area has mats cut at 5 1/2 inches square and 5 3/4 inches square. The decorative mats are cut at 4 inches and 3 5/8 inches. The bunny in the wheelbarrow is made about 3 3/4 inches tall. I also made three extra carrots for the right side that were sized to about two inches including the tops. The sentiment was made with design space and uses system fonts.


I created the card by folding it in half at the 6 inch mark, then folding the left section back to the left. With the card lying open, and leaving enough ribbon free for tying, I ran the ribbon around the back and over the left section. I attached the ribbon by running a glue dot runner over the ribbon. The mat with the sentiment was attached to the center of the right side of the card. The mat with the bunny was attached to the left most section so only the left half is attached to the flap and the other side is free. The two mats should line up so they lie one over the other when the card is closed. Close the card by tying the ribbon at the right side.

Thanks for stopping by!